

 |
Blueprints for this Lesson: |
|
 Foundational Knowledge:
Draw the following items using a pencil and a straight edge. The size of these figures doesn’t matter, just the features of the item and the labeling. When you are finished, check your drawings to see if they are correct.
- Opposite rays
 and
and 
 with a midpoint O.
 Click here to check
your answers.
Click here to check
your answers.
Framework for Understanding:
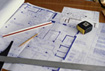
Architects use construction tools in their design work. They need more
than a ruler and graph paper; they use tools like a compass
and a protractor to help them construct angles and measure them. In architecture, blueprints can be created prior to the actual construction. These may be drawn by hand using specialized tools or with a computer program. At construction sites, the builders may need to create a quick sketch. They may not have the tools of precision available, so a quick drawing can be used. Drawings are typically created using only a straightedge and pencil. As a
Geometry student, it is very important that you learn to use these same
tools. In this lesson we are going to introduce the compass and learn
how to work with it.
Throughout this course, you will be asked to use
your compass and a straightedge to create various geometric constructions.
Later, you will also learn to use a software construction tool to do what
our handheld compasses do. This is one of the most exciting parts of any
geometry course, so let's get started.
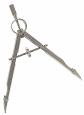 If you
have never practiced using a compass, spend some time drawing circles of
various radii. If the beginnings and ends of the circles connect exactly,
you've got it. If they are not connecting smoothly, here are some pointers
to help you properly use your compass.
If you
have never practiced using a compass, spend some time drawing circles of
various radii. If the beginnings and ends of the circles connect exactly,
you've got it. If they are not connecting smoothly, here are some pointers
to help you properly use your compass.
- Be sure the pencil tip is sharp and lines up with the metal tip when the compass is closed completely.
- If the arms of the compass are easily moved in and out and cannot be tightened, get a new compass.
- It is easier for the metal tip to "grip" the paper if there are several sheets of paper underneath the top sheet. Try putting a notebook underneath the paper.
- When drawing, keep most of the pressure on the metal tip and allow the pencil tip to glide around smoothly.
- Hold the compass at the top, not around its arms.
Using a Compass
We will use a compass to do more than make pretty circles. Try this construction with your own compass.
Construct a Segment Congruent to a Given Segment
Directions:
- Use your straightedge to draw a segment AB. Label the endpoints of the segment. (This will be the segment that you will copy).
- Draw a ray with endpoint X. Make sure it is longer than
 .
.

- Open your compass to the length of . (You will place the tip of your compass on point A and the pencil on point B.)
- With the same compass setting, put the compass point on point X. Draw an arc that intersects the ray.

- Label the point of intersection Y. You have just constructed a congruent segment!

Justification: Since you used AB for the opening of your compass, the transferred length onto the ray makes ![]() .
.
Construct a Segment Bisector
Directions:
- Use your straightedge to draw segment AB. Label the endpoints
of the segment.
- Place your compass point on A and stretch the compass MORE THAN half way to point B.
- With this length, swing a large arc that will go BOTH above and below .
Without changing the opening on the compass, place the compass point
on B and swing the arc again. The two arcs you have drawn should intersect.
- With your straightedge, connect the two points of intersection.
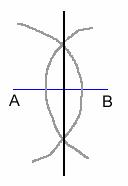
- This vertical line bisects .
Label the point where the new line and
cross as M.
Segment AB has now been bisected and AM = MB. (It could also be said that they are congruent.)
 NOTE: If
you do not wish to make a "large" arc in step 3, you may simply place
one small arc above
and one small arc below .
NOTE: If
you do not wish to make a "large" arc in step 3, you may simply place
one small arc above
and one small arc below .
Since the intersection of the two arcs are equidistant from A and B, the line that contains the intersection points of the arcs will go directly through the midpoint of the segment.
Construct the perpendicular to a given line through a point on the line
Directions:
- Use your straightedge to draw a line, x. Place point P on the line.

- Put the compass point on point P. Draw arcs intersecting x in two points. Label the two points A and B.

- Open the compass a little wider than the setting you used to create points A and B. With the compass tip on A, draw an arc above point P.
- Without changing the opening of your compass, place the compass point on B. Draw an arc that intersects the arc from step 3. Label the point of intersection C.

- Draw
 . This is your perpendicular line.
Justification: You constructed points A and B, so that P is equidistant from A and B. Then you constructed point C, so that C is equidistant from A and B. Thus ![]() is the perpendicular bisector of , and
is the perpendicular bisector of , and ![]() is perpendicular to x at P.
is perpendicular to x at P.
Congratulations, you did it! You know how to use a compass. Now, it is time to move on to some practice.