

 |
Blueprints for this Lesson: |
|
 Foundational Knowledge:
Match the names of the angles to the correct images.
Click Here to Begin the Matching ActivityFramework for Understanding:
You know how to identify types of angles by their measures, now let's practice creating them and measuring them using a tool called a protractor.
How to Measure Angles
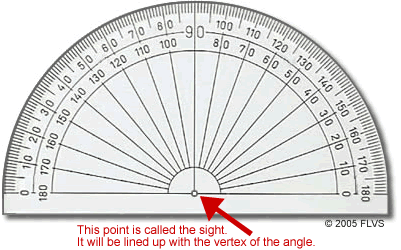
We use a protractor like this one to measure angles.
The unit of measure we use to measure angles is degrees and the symbol for degree is: °
If you don't have a protractor you can download a printable version.
* Note: To save the protractor file, right click on the link, select "Save
Target As..", and save the gmetry.doc file to your Desktop. Use Microsoft
Word to open the file from your desktop.
In geometry, angles measure between 0 and 180 degrees.
Examples using a protractor to measure angles
One of the greatest things about protractors is that you can use either side to measure with them. Look closely and you will see two scales running along the top curve of the protractor. See how it is marked 0° to 180° and then 180° to 0°?
When you use a protractor to measure an angle, first line up the vertex with the center of the protractor, called the “sight”. The sight of the protractor may be marked with cross bars, a circle, or even an arrow. Next, line up one side of the angle with the horizontal line that goes through the sight and the numbers 0° or 180°. To measure the angle, follow the scale that starts with 0°. Follow that row of numbers around until you see the other side of the angle.
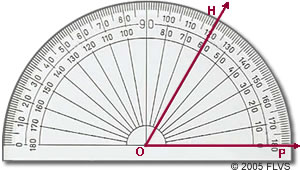
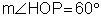
See how  goes through 0° on the protractor on the inside scale? That is where we start measuring the angle.
  goes through 120° and 60°, but we use 60° because it is on the same inner row of numbers as the 0° we started from. We also know it has to be 60° because
  is an acute angle that has a measure less than 90°.


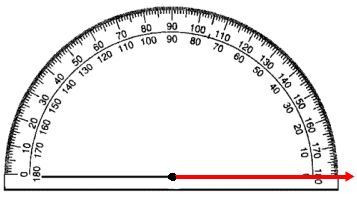
See how goes through 0° on this protractor on the outside scale? That is where we start measuring the angle.  goes through 120° and 60° but we use 120° because it is on the same outer row of numbers as the 0° we started from. We also know that
  is an obtuse angle that has a measure between 90° and 180°.
Drawing an Angle:
Let’s draw a 60° angle.
Step 1: Use a straightedge and draw a ray.

Step 2: Line up the endpoint of the ray with the sight on the protractor. Line up the ray with the horizontal line going through the sight and the numbers 0° or 180°.
Step 3: Follow the row of numbers that starts with 0°. Find the 60° and make a small mark.
Step 4: Use the straightedge side of the protractor to line up the vertex and the mark. Draw the ray and your angle is finished.

 It is important for you to be able to measure an angle and estimate the angle's measure. Move on to the Practice tab for some interactive practice with a protractor.
Be sure that you click on the assignment tab for this lesson. The questions that you need to answer for your instructor are located on the assignment tab.